Broken Concrete Pathway Repair Guide
Broken concrete pathways are a common eyesore, but fixing them doesn’t have to be a headache. This guide walks you through everything from identifying the type of damage to choosing the right repair method, equipping you with the knowledge and confidence to tackle the job yourself or make informed decisions if you hire a professional. We’ll cover various repair techniques, material choices, cost estimations, and preventative measures to keep your pathway looking its best for years to come.
Whether it’s a simple crack or a major collapse, understanding the cause of the damage is the first step. We’ll explore different types of damage, from surface cracks to structural failures, and delve into the common culprits like tree roots, frost heave, and improper installation. This will help you determine the best approach for a successful and lasting repair.
Types of Damage

Source: alamy.com
Concrete pathways, while durable, are susceptible to various forms of damage over time. Understanding these types of damage is crucial for effective repair and preventative maintenance. Factors like weather, usage, and the initial quality of the concrete all play a role in determining the pathway’s lifespan and the types of problems that might arise.
Causes of Cracking
Cracking in concrete pathways is a common issue stemming from several factors. Shrinkage cracking occurs as the concrete cures and loses moisture, causing it to contract. This is often seen as a network of fine cracks. Temperature fluctuations, especially significant changes between freezing and thawing, can lead to expansion and contraction stresses that result in larger cracks. Poorly compacted soil beneath the concrete can cause settling and cracking, as can heavy loads or impacts from vehicles or dropped objects. Finally, inadequate curing of the concrete after pouring can weaken it and make it more prone to cracking.
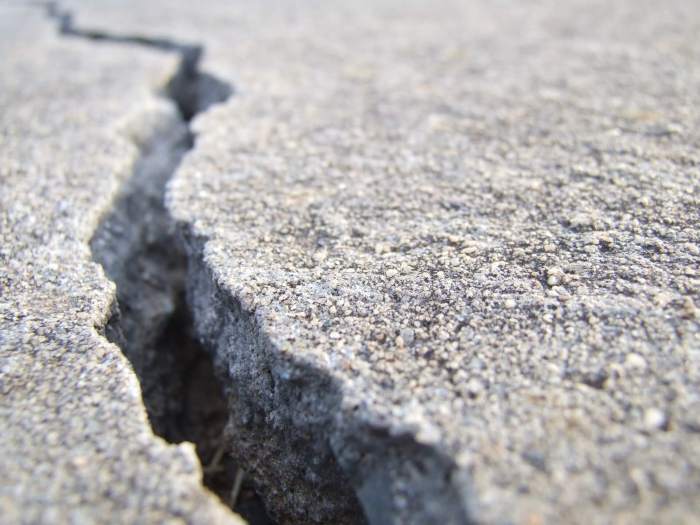
Surface Cracks versus Structural Damage
It’s important to distinguish between surface cracks and structural damage. Surface cracks, while unsightly, often only affect the top layer of the concrete. They might be caused by surface drying or minor settling. These are usually less serious and can often be repaired with surface treatments. Structural damage, however, involves deeper cracks that compromise the integrity of the concrete. These cracks often extend through the entire slab and can indicate significant underlying issues, such as poor base preparation or excessive loading. Structural damage requires more extensive repairs to ensure the pathway’s long-term stability.
Examples of Concrete Pathway Damage
The following table provides examples of different types of concrete pathway damage, their causes, severity, and common repair methods.
| Type of Damage | Cause | Severity | Repair Method |
|---|---|---|---|
| Hairline Cracks | Shrinkage, temperature changes | Low | Crack sealing |
| Spalling | Freezing and thawing, chemical attack | Medium | Patching, replacement of damaged sections |
| Cracking due to Settlement | Poor sub-base compaction, undermining | High | Lifting and relaying, soil stabilization |
| Large Cracks (Structural) | Heavy loads, poor concrete mix, significant settling | High | Extensive patching, possibly full replacement |
Repair Methods

Source: mumsnet.com
Fixing a broken concrete pathway depends heavily on the extent of the damage. Small cracks might only need patching, while significant damage requires a more comprehensive approach, potentially even full replacement. Choosing the right method saves time, money, and ensures a long-lasting repair.
Repairing damaged concrete pathways involves several methods, each suited to different levels of damage. These range from simple patching for minor cracks to complete replacement for severely fractured or deteriorated sections. The choice of method will depend on factors such as the size and type of damage, the overall condition of the pathway, and your budget.
Patching Techniques
Patching is ideal for small cracks, chips, and minor surface damage. It’s a cost-effective and relatively quick solution, but it’s not suitable for extensive damage. Effective patching requires careful preparation of the damaged area to ensure a strong, lasting bond. This involves cleaning the area, removing loose debris, and creating a slightly roughened surface for better adhesion. Different patching materials exist, including concrete patching compounds, epoxy resins, and specialized mortars. The choice of material depends on the severity of the damage and the desired durability. For example, a quick-setting patching compound might suffice for a small chip, while a stronger epoxy resin would be preferable for a larger crack.
Full Replacement
When significant portions of the pathway are severely damaged, cracked, or deteriorated, full replacement is the most effective solution. This involves removing the damaged section completely and pouring new concrete. This method is more labor-intensive and expensive than patching, but it provides a long-lasting and aesthetically pleasing repair. Proper preparation is crucial for success, including excavation of the damaged area to a sufficient depth, installation of a proper base, and ensuring adequate compaction before pouring the new concrete. Using reinforcing mesh within the new concrete will further increase its strength and durability. For example, a pathway severely damaged by tree roots might require complete removal of the affected section and its replacement with new concrete, perhaps with added reinforcement to prevent future root damage.
Epoxy Resins in Concrete Repair
Epoxy resins are strong, durable adhesives particularly well-suited for repairing cracks in concrete. They penetrate deeply into the crack, bonding the fractured pieces together and providing superior strength and waterproofing. Two-part epoxy systems are common, requiring mixing the resin and hardener immediately before application. The mixture is then injected into the crack using a specialized tool, ensuring complete filling. Epoxy resins are resistant to chemicals and weathering, making them ideal for outdoor applications like concrete pathways. Their strength and durability make them suitable for even wider cracks, offering a more permanent solution compared to simple patching compounds. For instance, a significant crack that shows signs of water infiltration might benefit greatly from epoxy resin injection to seal it and prevent further damage.
Repairing a Small Crack
Repairing a small crack involves several steps:
- Clean the crack thoroughly, removing any loose debris or dust using a wire brush or compressed air.
- Widen the crack slightly using a chisel or other suitable tool to allow for better penetration of the repair material.
- Vacuum the crack to remove any remaining debris.
- Apply a suitable patching compound or epoxy resin, ensuring complete filling of the crack. For epoxy, carefully follow the manufacturer’s instructions regarding mixing ratios and application time.
- Allow the repair material to cure completely according to the manufacturer’s instructions. This usually takes several hours, but complete curing may take longer.
- Once cured, smooth the surface of the repair using a trowel or sandpaper to blend it seamlessly with the surrounding concrete.
Materials and Tools: Broken Concrete Pathway

Source: alamy.com
Repairing a broken concrete pathway requires the right materials and tools to ensure a durable and long-lasting fix. Choosing the appropriate materials depends on the extent of the damage and the desired aesthetic outcome. Having the correct tools will make the job easier, safer, and more efficient.
Necessary Materials for Concrete Pathway Repair
The specific materials needed will vary depending on the repair method chosen (e.g., patching, resurfacing, or complete replacement). However, some common materials include concrete patching compound, concrete mix (if creating a new section), bonding agent, water, and possibly a release agent (depending on the formwork used). For larger repairs or resurfacing, you might also need reinforcing mesh (wire mesh) to strengthen the concrete. Remember to always buy slightly more materials than you estimate needing to account for waste and unforeseen circumstances. For example, if you need 1 cubic foot of concrete mix, buying 1.25 cubic feet is advisable.
Essential Tools for Concrete Pathway Repair
Having the right tools is crucial for a successful repair. This list covers tools for various repair methods, from simple patching to more extensive work.
- Shovel/Spade: For removing loose or damaged concrete.
- Hammer and Chisel: For breaking up larger pieces of damaged concrete and creating clean edges for patching.
- Wire Brush: To clean the surface of the concrete before applying a patching compound or new concrete.
- Bucket and Mixing Trowel/Hoe: For mixing concrete patching compound or concrete mix.
- Measuring Tools (Tape Measure, Level): To accurately measure and ensure even surfaces.
- Concrete Trowel: For smoothing and finishing the repaired concrete.
- Edging Tool: For creating clean, straight edges on the repaired area.
- Wheelbarrow (for larger jobs): To transport materials and mix.
- Safety Glasses and Gloves: To protect your eyes and hands from debris and chemicals.
- Knee Pads: To protect your knees while working on the ground.
Properties of Different Concrete Patching Compounds
Concrete patching compounds come in various formulations, each with different properties. Quick-setting compounds are ideal for small repairs where rapid curing is necessary while slower-setting compounds allow for more time to work and achieve a smoother finish. Some compounds are designed for specific applications, such as filling cracks or repairing larger holes. Always read the manufacturer’s instructions to ensure the correct application and curing time. For instance, some compounds might require specific curing conditions, such as protection from direct sunlight or rain. The choice depends on the size and type of repair needed and the expected weather conditions.
Safety Precautions When Working with Concrete Repair Materials
Working with concrete and its related materials requires careful attention to safety. Ignoring safety precautions can lead to injuries.
- Always wear safety glasses: Debris can easily fly up during the demolition and repair process.
- Use work gloves: To protect your hands from irritants and cuts.
- Work in a well-ventilated area: Some concrete mixes and patching compounds release dust or fumes.
- Protect your skin: Wear long sleeves and pants to prevent skin irritation from cement.
- Avoid contact with eyes: Immediately flush with water if contact occurs and seek medical attention if necessary.
- Dispose of waste properly: Follow local regulations for disposing of concrete debris and leftover materials.
Cost Considerations

Source: dreamstime.com
Repairing a broken concrete pathway can range significantly in price, depending on the extent of the damage, the chosen repair method, and whether you tackle the job yourself or hire a professional. Understanding these cost factors is crucial for budgeting your project effectively.
Cost Breakdown by Repair Method
The cost of repairing your concrete pathway varies greatly depending on the chosen method. Simple crack repairs, for instance, might only cost a few dollars for materials if you’re doing it yourself. However, more extensive repairs, like replacing a large section of damaged concrete, could cost hundreds or even thousands of dollars, especially if you hire a contractor. For example, patching small cracks with epoxy resin might cost around $10-$20 for a small quantity, while a complete section replacement could involve $50-$100+ in materials alone, not including labor. Larger projects requiring significant excavation and concrete pouring will naturally increase expenses considerably.
DIY vs. Professional Repair Costs
A significant cost factor is whether you choose to perform the repairs yourself or hire a professional. DIY repairs are generally cheaper, especially for minor fixes, as you only pay for materials. However, this approach requires time, effort, and the right tools and skills. Mistakes can lead to further damage and increased costs in the long run. Professional services offer expertise, and efficiency, and often come with warranties, but they come at a higher price. For example, hiring a contractor to replace a 10-square-foot section of pathway might cost anywhere from $300 to $800, depending on location and labor rates. This contrasts with a DIY approach where materials might only cost $50-$100.
Factors Influencing Overall Repair Costs
Several factors influence the final cost of concrete pathway repair. These include:
- The extent of Damage: Minor cracks require less work and materials than extensive damage requiring section replacement or complete resurfacing.
- Location: Labor costs vary geographically. Urban areas generally have higher labor rates than rural areas.
- Accessibility: Difficult-to-reach areas may increase labor costs as they require more time and effort.
- Materials Used: High-quality materials, such as specialized concrete mixes or premium sealants, are more expensive than standard options.
- Labor Costs (if hiring a professional): Hourly rates for contractors vary widely depending on experience and location.
- Permits and Inspections: Some localities require permits for concrete work, adding to the overall cost.
Estimating Materials Costs for a Specific Repair
To estimate materials costs, you’ll need to assess the damaged area and the chosen repair method. Let’s say you need to repair a 2ft x 3ft section of cracked concrete using a concrete patching compound. If the patching compound costs $25 per bag, and you estimate needing one bag for this area, your materials cost is approximately $25. However, remember to add costs for any additional materials like primer, sealant, tools (if you don’t already own them), and potentially safety equipment. For larger projects, obtain detailed quotes from suppliers for the necessary quantities of concrete, rebar, and other materials. Always add a contingency of 10-15% to account for unexpected costs or material waste.
Prevention and Maintenance
Source: alamy.com
A well-maintained concrete pathway can last for decades, saving you time, money, and headaches down the line. Proactive prevention and regular maintenance are key to extending its lifespan and avoiding costly repairs. By implementing a simple preventative plan and sticking to a regular maintenance schedule, you can ensure your pathway remains attractive and functional for years to come.
Preventative measures focus on minimizing exposure to the elements and preventing damage from the outset. Regular inspections allow for early detection of potential problems, enabling prompt and less expensive repairs. Cleaning and sealing protect the concrete’s surface, enhancing its durability and aesthetic appeal.
Preventative Measures for Concrete Pathways
Taking steps to protect your pathway from the start is crucial. This includes proper installation, using high-quality materials, and considering the pathway’s location and environmental factors. For example, ensuring proper drainage prevents water accumulation, a major cause of cracking and deterioration. Using expansion joints every few feet allows for natural expansion and contraction due to temperature changes, minimizing stress on the concrete. Finally, choosing a concrete mix appropriate for your climate helps it withstand the specific challenges of your environment, such as freeze-thaw cycles in colder climates or extreme heat in hotter ones.
Importance of Regular Inspections and Maintenance
Regular inspections are vital for early problem detection. Small cracks or surface damage, if left unaddressed, can quickly escalate into larger, more expensive issues. A yearly inspection, ideally after the winter thaw or during the dry season, allows you to identify and address minor problems before they become major headaches. This proactive approach can significantly extend the life of your pathway and save you considerable money in the long run. For example, a small crack noticed early can be easily sealed, preventing water infiltration and the subsequent damage that can lead to costly repairs.
Cleaning and Sealing Concrete Pathways
Cleaning your pathway regularly removes dirt, debris, and contaminants that can weaken the concrete over time. Regular sweeping or pressure washing (using a low-pressure setting to avoid damaging the surface) is recommended. Sealing the concrete provides an additional layer of protection against water damage, freeze-thaw cycles, and staining. A quality sealer penetrates the concrete, filling small pores and preventing water from penetrating and causing damage. Reapplication every few years, depending on the sealer and climate, is usually recommended. For example, a pathway in a high-traffic area or a region with harsh winters might require more frequent sealing.
Routine Maintenance Schedule
A simple schedule can help ensure your pathway receives the attention it needs.
| Task | Frequency | Notes |
|---|---|---|
| Sweep or blow debris | Weekly | Removes loose dirt and prevents build-up. |
| Pressure wash (low pressure) | Twice yearly | Removes ingrained dirt and stains. |
| Inspect for cracks and damage | Annually | Identify and address small issues before they worsen. |
| Seal concrete | Every 2-3 years | Protects against water damage and staining. Frequency depends on climate and sealer type. |
| Repair cracks and damage | As needed | Address any issues promptly to prevent further damage. |
Visual Representation of Damage
Source: bakersfieldconcretecontractors.com
Let’s get visual with some common concrete pathway problems. Seeing is believing, and understanding the different types of damage is key to effective repair. We’ll look at three scenarios to illustrate the range of issues you might encounter.
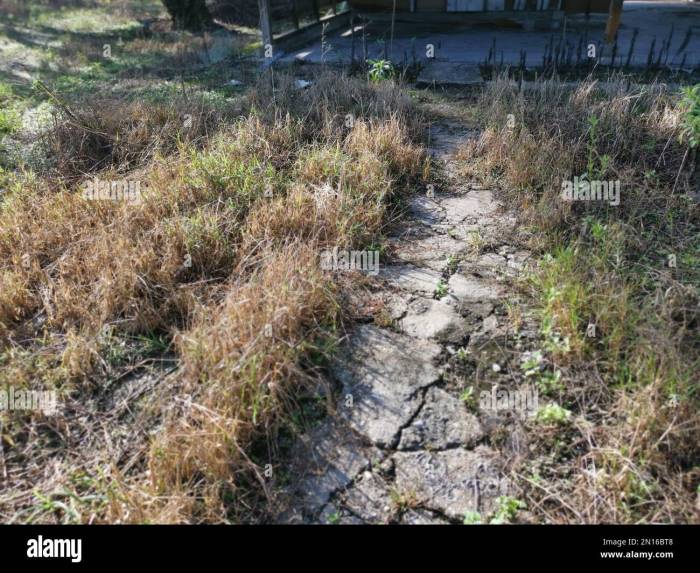
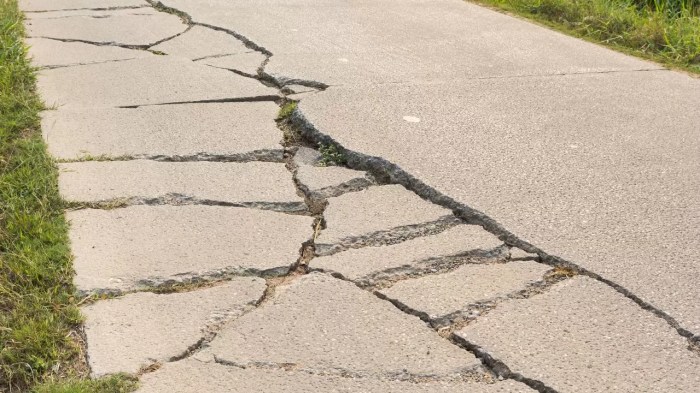
Severely Cracked Concrete Pathway: Imagine a pathway winding through a slightly overgrown garden. The concrete is a dull grey, streaked with green algae in damp patches. Several large cracks crisscross the surface, some running several feet in length. These cracks are not just hairline fractures; they’re wide enough (up to half an inch) to allow small stones and weeds to sprout inside. Some cracks are jagged and irregular, suggesting a forceful impact, while others are relatively straight, hinting at settling or ground movement. The surrounding area is gently sloping downwards, which likely contributed to the uneven settling and cracking. The vegetation, mostly low-lying shrubs, and groundcover is encroaching on the edges of the path in places, further obscuring the extent of the damage.
Cracked Concrete Pathway Appearance
This example showcases the severity of cracking and how environmental factors can exacerbate the problem. The combination of wide cracks, uneven settling, and encroaching vegetation illustrates a pathway in significant need of repair. The algae growth indicates consistent moisture, which can further weaken the concrete. The irregular nature of the cracks suggests a combination of causes rather than a single event.
Spalling and Deterioration of Concrete Pathway
Now picture a different scene: a concrete pathway exposed to harsh weather conditions. The surface is no longer smooth; instead, it’s pitted and rough, exhibiting significant spalling. Large chunks of concrete are missing, revealing the aggregate beneath. The original grey color is faded and uneven, with patches of lighter grey and even yellowish discoloration from weathering and oxidation. The texture is significantly altered; it’s no longer a consistent smooth surface, but rather a coarse, uneven terrain. The edges of the pathway show significant chipping and crumbling. This deterioration indicates long-term exposure to the elements and the lack of proper sealing or maintenance.
Spalling and Deterioration Appearance
The uneven color and texture of the concrete highlight the extent of the damage. The spalling reveals the underlying aggregate, indicating a loss of surface integrity. The roughness of the surface poses a tripping hazard, and the overall appearance is unsightly. This scenario highlights the importance of preventative measures and regular maintenance.
Completely Collapsed Section of Concrete Pathway
Finally, let’s consider a scenario where a significant portion of the pathway has completely failed. Imagine a roughly rectangular section, approximately 3 feet by 2 feet, is completely missing. The surrounding concrete is fractured and uneven, indicating a significant subsurface failure. The edges of the collapsed section are jagged and sharp, posing a safety hazard. The ground underneath is exposed, revealing compacted soil and possibly even underlying rubble or debris. The surrounding area shows signs of instability, with minor cracks extending outward from the collapsed section. The soil around the missing section appears slightly depressed, further suggesting underlying instability.
Collapsed Section Appearance
This drastic example shows the complete failure of a pathway section. The size and shape of the missing section, along with the surrounding damage, suggest a severe underlying problem that requires immediate and comprehensive repair. The exposed soil and uneven edges highlight the significant safety risk posed by this type of damage. This is not a simple patching job; this requires a substantial reconstruction effort.
Repairing Specific Damage Types
Source: com.au
Repairing damaged concrete pathways involves different techniques depending on the severity and type of damage. This section details the processes for addressing three common issues: large, deep cracks; potholes; and sunken slabs. Remember safety first – wear appropriate safety gear, including gloves, eye protection, and sturdy footwear.
Repairing Large, Deep Cracks
Large, deep cracks in a concrete pathway indicate significant structural weakness and require thorough repair to prevent further damage and potential tripping hazards. The repair process involves cleaning the crack, preparing the edges, filling the crack with a suitable patching compound, and finally, smoothing and sealing the repair. For cracks wider than ¼ inch, consider using a crack filler designed for concrete repair, following the manufacturer’s instructions carefully. This ensures proper adhesion and durability of the repair.
Repairing Potholes
Potholes in concrete pathways are often caused by freeze-thaw cycles, heavy traffic, or underlying soil erosion. Repairing a pothole necessitates removing loose or damaged concrete, cleaning the area thoroughly, and then filling the void with a suitable patching material. For smaller potholes, a high-quality concrete patching compound can suffice. For larger potholes, consider using a concrete mix specifically formulated for patching. Ensure the patching material is properly compacted to prevent future settling. Allow sufficient curing time before restoring the surface to its original level and texture.
Lifting and Resetting Sunken Concrete Slabs, Broken concrete pathway
Sunken concrete slabs are unsightly and pose a tripping hazard. Lifting and resetting these slabs requires careful planning and execution. The process begins by assessing the extent of the sinking and identifying the underlying cause. This might involve excavating around the slab to check for soil erosion or voids beneath. Once the cause is addressed, the slab can be lifted using hydraulic jacks or other suitable lifting equipment. Mortar is then used to support the slab and ensure its stability. Finally, the surrounding area is backfilled and compacted, restoring the pathway to its original level. For significant settling, consulting a professional concrete contractor might be necessary to ensure the repair is structurally sound and long-lasting.
Final Summary

Source: housedigest.com
Repairing a broken concrete pathway might seem daunting but with the right information and a bit of elbow grease (or a skilled contractor!), it’s a manageable project. From understanding the different types of damage and choosing appropriate repair methods to planning for preventative maintenance, this guide has armed you with the tools to restore your pathway’s beauty and functionality. Remember, a little proactive maintenance goes a long way in preventing costly repairs down the road, so keep those inspections regular!